Deploying on AWS
Symplegma supports AWS as a cloud provider.
Architecture
contrib/aws/ contains terraform file to deploy the following architecture. This is strongly opinionated and deploys the following architecture:
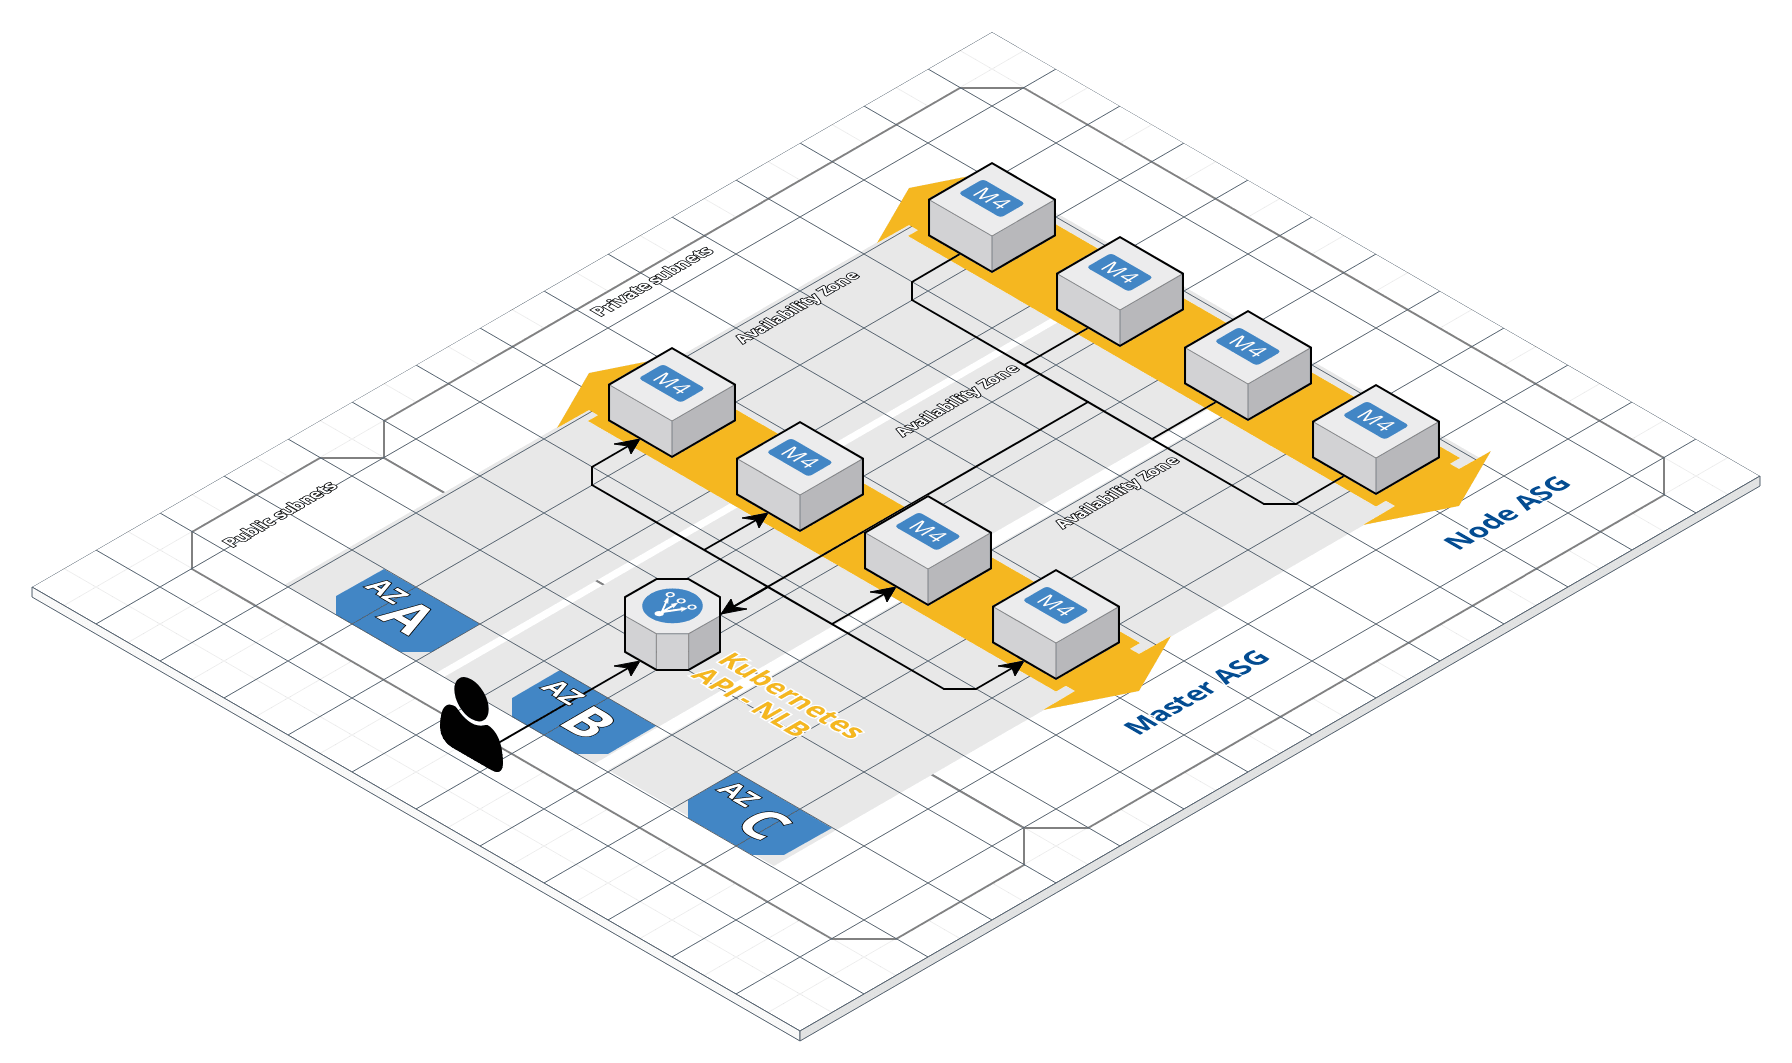
For now, each cluster has its own VPC, subnets, NAT etc. VPC module is included inside the symplegma module, this is subject to change in the future as PR are welcomed to make the possibilities evolved and split modules.
Requirements
Git clone Symplegma main repository:
git clone https://github.com/clusterfrak-dynamics/symplegma.git
Fetch the roles with ansible-galaxy:
ansible-galaxy install -r requirements.yml
Terraform and Terragrunt
Terragrunt is used to enable multiple cluster and environments, also to enable remote state storage and locking with Terraform.
Terraform remote state is stored in an encrypted S3 bucket and state locking is done with AWS DynamoDB.
Terragrunt modules
Symplegma is packaged in a Terragrunt module available here.
Terragrunt variables
Remote state specific variables:
terragrunt = {
  remote_state {
    backend = "s3"
    config {
      bucket         = "symplegma-remote-state"
      key            = "${path_relative_to_include()}"
      region         = "eu-west-1"
      encrypt        = true
      dynamodb_table = "symplegma-remote-state-lock"
    }
  }
}
Cluster specific variables:
terragrunt = {
  include {
    path = "${find_in_parent_folders()}"
  }

  terraform {
    source = "github.com/clusterfrak-dynamics/symplegma.git//contrib/aws/terraform/modules/symplegma"
  }
}

//
// [provider]
//
aws_region = "eu-west-1"

//
// [kubernetes]
//
cluster_name = "symplegma"

//
// [module][vpc]
//
vpc_name = "symplegma"
vpc_cidr = "10.0.0.0/16"
vpc_azs             = ["eu-west-1a", "eu-west-1b", "eu-west-1c"]
vpc_private_subnets = ["10.0.1.0/24", "10.0.2.0/24", "10.0.3.0/24"]
vpc_public_subnets  = ["10.0.101.0/24", "10.0.102.0/24", "10.0.103.0/24"]
vpc_enable_nat_gateway = true
vpc_enable_dns_hostnames = true
vpc_tags = {
    Environment = "sample"
}

//
// [module][bastion]
//
bastion_name = "symplegma-bastion"
bastion_ami = "ami-00035f41c82244dab"
bastion_instance_type = "t2.small"
bastion_key_name = "klefevre-sorrow"

bastion_tags = {
    Terraform = "true"
    Environment = "sample"
}

//
// [module][master_asg]
//
master_asg_ami = "ami-099b2d1bdd27b4649"
master_asg_root_volume_size = 50
master_asg_max_size = 3
master_asg_min_size = 3
master_asg_desired_capacity = 3
master_asg_instance_type = "t3.large"
master_asg_key_name = "klefevre-sorrow"
master_asg_tags = [
    {
      key                 = "Environment"
      value               = "sample"
      propagate_at_launch = true
    }
  ]

//
// [module][node_asg]
//
node_asg_ami = "ami-099b2d1bdd27b4649"
node_asg_root_volume_size = 50
node_asg_max_size = 2
node_asg_min_size = 2
node_asg_desired_capacity = 2
node_asg_instance_type = "t3.large"
node_asg_key_name = "klefevre-sorrow"
node_asg_tags = [
    {
      key                 = "Environment"
      value               = "sample"
      propagate_at_launch = true
    }
  ]

//
// [nlb]
//
kubernetes_api_lb_port = 443
kubernetes_api_tg_port = 6443
kubernetes_api_lb_tags = {
      Environment = "sample"
}
Creating the infrastructure
To init a new AWS cluster, simply run ./scripts/init-aws.sh $CLUSTER_NAME
It will generate inventory/aws/$CLUSTER_NAME with the following directory structure:
sample
├── aws.py -> ../../../contrib/aws/inventory/aws.py
├── extra_vars.yml
├── group_vars
│   └── all
│       └── all.yml
├── host_vars
├── symplegma-ansible.sh -> ../../../contrib/aws/scripts/symplegma-ansible.sh
└── tf_module_symplegma
    └── terraform.tfvars
Customizing the infrastructure
Terraform variable files come with sensible default for the eu-west-1 region.
If you wish to change remote state configuration you can edit $CLUSTER_NAME/terraform.tfvars
If you wish to customize the infrastructure you can edit $CLUSTER_NAME/tf_module_symplegma/terraform.tfvars
One of the most important variable is cluster_name that allows you tu use AWS dynamic inventory with multiple cluster. We recommend this variables to be coherent throughout your files and equals to $CLUSTER_NAME defined earlier.
There is also a set of sensible default tags that you can customize such as Environment for example or add your own.
To avoid bloating the configuration files and unnecessary hard coded values, Terraform provider credentials are derived from your AWS SDK config. Make sure you are using the correct aws profile by setting your AWS_PROFILE environment variable.
Initializing the infrastructure
Once everything is configured to your needs, just run:
terragrunt apply-all --terragrunt-source-update
Couples minute later you should see your instances spawning in your EC2 dashboard.
Deploying Kubernetes with symplegma playbooks
AWS Dynamic inventory
AWS dynamic inventory allows you to target a specific set of instances depending on the $CLUSTER_NAME you set earlier. You can configure the behavior of dynamic inventory by setting the following ENV:
export SYMPLEGMA_CLUSTER=$CLUSTER_NAME: Target only instances belonging to this cluster.export SYMPLEGMA_AWS_REGION=eu-west-1: AWS region where instances are targeted.
To test the behavior of the dynamic inventory just run:
./inventory/aws/${CLUSTER_NAME}/aws.py --list
It should only return a specific subset of your instances.
Info
These variables can be exported automatically when using the deployment script, but they can still be set manually for testing / manual deployment purposes.
Customizing Kubernetes deployment
In the cluster folder, it is possible to edit Ansible variables:
group_vars/all/all.yml: contains default Ansible variables.
---
bootstrap_python: false
# Install portable python distribution that do not provide python (eg.
# coreos/flatcar):
# bootstrap_python: true
# ansible_python_interpreter: /opt/bin/python

ansible_ssh_user: ubuntu

ansible_ssh_common_args: '-o StrictHostKeyChecking=no'
# To use a bastion host between node and ansible use:
# ansible_ssh_common_args: '-o StrictHostKeyChecking=no -o ProxyCommand="ssh -o StrictHostKeyChecking=no -W %h:%p -q ubuntu@{{ ansible_ssh_bastion_host }}"'
# ansible_ssh_bastion_host: __BASTION_IP__

kubeadm_version: v1.24.1
kubernetes_version: v1.24.1
# If deploying HA clusters, specify the loadbalancer IP or domain name and port
# in front of the control plane nodes:
# kubernetes_api_server_address: __LB_HOSTNAME__
# kubernetes_api_server_port: __LB_LISTENER_PORT__

bin_dir: /usr/local/bin
# Change default path for custom binary. On OS with immutable file system (eg.
# coreos/flatcar) use a writable path
# bin_dir: /opt/bin

# Customize API server
kubeadm_api_server_extra_args: {}
kubeadm_api_server_extra_volumes: {}

# Customize controller manager scheduler
# eg. to publish prometheus metrics on "0.0.0.0":
# kubeadm_controller_manager_extra_args: |
#   address: 0.0.0.0
kubeadm_controller_manager_extra_args: {}
kubeadm_controller_manager_extra_volumes: {}

# Customize scheduler manager scheduler
# eg. to publish prometheus metrics on "0.0.0.0":
# kubeadm_scheduler_extra_args: |
#   address: 0.0.0.0
kubeadm_scheduler_extra_volumes: {}
kubeadm_scheduler_extra_args: {}

# Customize Kubelet
# `kubeadm_kubelet_extra_args` is to be used as a last resort,
# `kubeadm_kubelet_component_config` configure kubelet wth native kubeadm API,
# please see
# https://kubernetes.io/docs/tasks/administer-cluster/kubelet-config-file/ for
# more information
kubeadm_kubelet_component_config: {}
kubeadm_kubelet_extra_args: {}


# Customize Kube Proxy configuration using native Kubeadm API
# eg. to publish prometheus metrics on "0.0.0.0":
# kubeadm_kube_proxy_component_config: |
#   metricsBindAddress: 0.0.0.0
kubeadm_kube_proxy_component_config: {}

# Additionnal subject alternative names for the API server
# eg. to add aditionnals domains:
# kubeadm_api_server_cert_extra_sans: |
#   - mydomain.example.com
kubeadm_api_server_cert_extra_sans: {}

kubeadm_cluster_name: symplegma

# Do not label master nor taint (skip kubeadm phase)
# kubeadm_mark_control_plane: false

# Enable systemd cgroup for Kubelet and container runtime
# DO NOT CHANGE this on an existing cluster: Changing the cgroup driver of a
# Node that has joined a cluster is strongly not recommended. If the kubelet
# has created Pods using the semantics of one cgroup driver, changing the
# container runtime to another cgroup driver can cause errors when trying to
# re-create the Pod sandbox for such existing Pods. Restarting the kubelet may
# not solve such errors. Default is to use cgroupfs.
# systemd_cgroup: true

container_runtime: containerd
Info
ansible_ssh_bastion_host, kubernetes_api_server_address and kubernetes_api_server_port can be automatically populated when using the deployment script but they can still be set manually for testing / manual deployment purposes.
extra_vars: contains AWS cloud provider specific variables that you can override.
---
kubeadm_api_server_extra_args: |
  cloud-provider: "aws"

kubeadm_controller_manager_extra_args: |-
    cloud-provider: "aws"
    configure-cloud-routes: "false"

kubeadm_scheduler_extra_args: {}
kubeadm_api_server_extra_volumes: {}
kubeadm_controller_manager_extra_volumes: {}
kubeadm_scheduler_extra_volumes: {}
kubeadm_kubelet_extra_args: |
  cloud-provider: "aws"

calico_mtu: 8981
calico_ipv4pool_ipip: "CrossSubnet"
Info
If you need to override control plane or kubelet specific parameters do it in extra_vars.yml as it overrides all other variables previously defined as per Ansible variables precedence documentantion
Running the playbooks with deployment script
A simple (really, it cannot be simpler) deployment script can call Ansible and compute the necessary Terraform output for you:
#! /bin/sh

INVENTORY_DIR=$(dirname "${0}")

export SYMPLEGMA_CLUSTER="$( cd "${INVENTORY_DIR}" && terragrunt output-all cluster_name 2>/dev/null )"
export SYMPLEGMA_AWS_REGION="$( cd "${INVENTORY_DIR}" && terragrunt output-all aws_region 2>/dev/null )"

ansible-playbook -i "${INVENTORY_DIR}"/aws.py symplegma-init.yml -b -v \
  -e @"${INVENTORY_DIR}"/extra_vars.yml \
  -e ansible_ssh_bastion_host="$( cd "${INVENTORY_DIR}" && terragrunt output-all -module=bastion public_ip 2>/dev/null )" \
  -e kubernetes_api_server_address="$( cd "${INVENTORY_DIR}" && terragrunt output-all kubernetes_api_lb_dns_name 2>/dev/null )" \
  -e kubernetes_api_server_port="$( cd "${INVENTORY_DIR}" && terragrunt output-all kubernetes_api_lb_listener_port 2>/dev/null)" \
  ${@}
From the root of the repository just run your cluster deployment script:
./inventory/aws/${CLUSTER_NAME}/symplegma-ansible.sh
Testing cluster access
When the deployment is over, admin.conf should be exported in kubeconfig/$CLUSTER_NAME/admin.conf. You should be able to call the Kubernetes API with kubectl:
export KUBECONFIG=$(pwd)/kubeconfig/${CLUSTER_NAME}/admin.conf

kubectl get nodes

NAME                                       STATUS   ROLES    AGE     VERSION
ip-10-0-1-140.eu-west-1.compute.internal   Ready    <none>   2d22h   v1.13.0
ip-10-0-1-22.eu-west-1.compute.internal    Ready    master   2d22h   v1.13.0
ip-10-0-2-47.eu-west-1.compute.internal    Ready    <none>   2d22h   v1.13.0
ip-10-0-2-8.eu-west-1.compute.internal     Ready    master   2d22h   v1.13.0
ip-10-0-3-123.eu-west-1.compute.internal   Ready    master   2d22h   v1.13.0
Running E2E test with Sonobuoy
If you want to test your cluster, you can use Sonobuoy which run the standard conformance testing suite on your cluster.
Go to Sonobuoy scanner and just follow the instructions, the test results should be available after ⅔h.
EOD